








































 SWEDEN / SEK
ProShield® Vinyl Foil
PROSHIELD® · PREMIUM PROTECTIVE FILM · ENGINEERED TO PERFORM
ProShield® protective film for headlights and lights
A formable, impact-absorbing, high-gloss protective film that helps preserve headlights, rear lights and other exposed surfaces. ProShield® combines effective protection with the opportunity to create a distinctive look.
View the installation guide →ProShield® at a glance
Thickness:
0.2 mm
Surface:
High-gloss finish
Options:
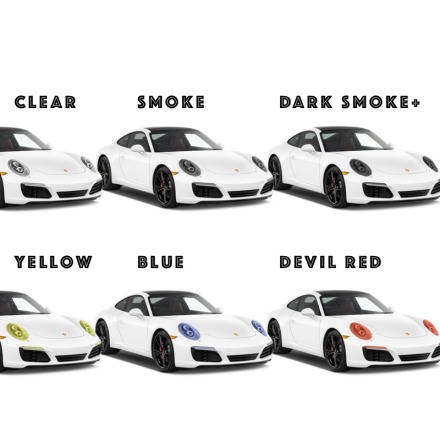
Clear/Transparent, Smoke, Dark Smoke+, Yellow, Blue and Devil Red
Installation:
Wet or dry installation
Product warranty:
3 years according to the terms
Protection from everyday wear
The 0.2 mm film helps protect against stone chips, road salt, dirt and abrasive debris from the road.
99% UV protection
The UV protection helps preserve the light surface and the film's appearance during normal use.
High-gloss finish
When correctly installed, the glossy surface gives the lights a clean, well-kept and exclusive appearance.
Formable and flexible
The film is formed over curved areas using a heat gun and is slightly self-healing when carefully heated.
THOUGHTFULLY ENGINEERED
Three layers that protect throughout installation
ProShield® has a three-layer construction. It protects both the adhesive side and the visible surface of the film while the material is handled, formed and installed.
LAYER 1
Adhesive-side liner
The lower protective liner is removed before installation. The adhesive side of the film is then positioned against the cleaned light surface.
LAYER 2
The protective film itself
The 0.2 mm ProShield® layer provides impact-absorbing protection and the final high-gloss surface.
LAYER 3
Scratch-protective top layer
The upper layer protects the film while you work. Peel it away when the installation is nearly complete.
CHOOSE YOUR LOOK
From transparent protection to distinctive styling
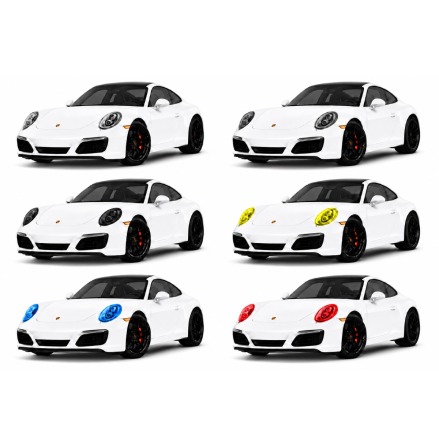
ProShield® is available in Clear/Transparent, Smoke, Dark Smoke+, Yellow, Blue and Devil Red. Choose clear protection that retains the original appearance of the lights or a tinted option that gives the vehicle greater character.
Clear/Transparent
Clear, high-gloss protection that retains the light's original appearance.
Smoke & Dark Smoke+
Two smoked options for a subtle or more pronounced dark appearance.
Yellow, Blue & Devil Red
Expressive colours for drivers who want to give their lights more individual styling.
INSTALLATION VIDEO
See how to install ProShield®
Watch the video and read the complete installation guide before you begin. Careful cleaning, the correct tools and controlled forming provide the best result.
The video loads only when you click the button. This makes the page faster and reduces unnecessary data use.
THE RIGHT PREPARATION
Install wet or dry
For wet installation, moisten the light surface and the adhesive side of the film with installation fluid. Position the film, then press out the fluid with an installation squeegee.
Dry installation can be used when the surface and shape allow it, but provides less opportunity to reposition the film once the adhesive has bonded.
CONTROLLED FORMING
Form curved areas with heat
Gradually heat the film with a heat gun to approximately 100 °C and form it over the curved areas of the light. Keep the heat gun moving and avoid overheating.
When the film lies evenly, trim away the excess. Check the edges, then remove the upper scratch-protective layer.
Measure the lights before ordering
Light dimensions and shapes vary between vehicles. Measure your headlights at their widest and tallest points, add a reasonable installation margin and order the film size accordingly.
PEACE OF MIND AFTER PURCHASE
3-year product warranty
ProShield® headlight film is covered by a 3-year product warranty against fading, incorrect colour reproduction and cracking, according to the applicable warranty terms.
Important information about coloured and tinted films
Coloured or tinted film can affect the light pattern and light transmission. You are responsible for ensuring that the selected film and its installation comply with the regulations where the vehicle is used. Do not cover sensors, reflectors or other functions that must remain unobstructed.
Ready to install ProShield®?
Read the full guide and watch the installation video before you begin. It contains the correct work sequence, tools and important tips for a clean final result.
Go to the installation guide →